💡 Elevate Your Storage Game!
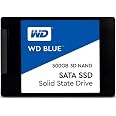
The Western Digital 500GB WD Blue 3D NAND Internal PC SSD offers high-speed performance with sequential read speeds up to 560MB/s and write speeds up to 530MB/s. Designed for reliability, it boasts an impressive 1.75 million hours mean time to failure (MTTF) and is compatible with a variety of systems, making it an ideal choice for both professionals and tech enthusiasts.

| RAM | 500 GB |
| Hard Drive | 500 GB Solid State Drive |
| Number of USB 2.0 Ports | 1 |
| Brand | Western Digital |
| Series | WESTERN DIGITAL TECHNOLOGIES |
| Item model number | WDS500G2B0A |
| Hardware Platform | PC & Mac |
| Operating System | Windows |
| Item Weight | 1.3 ounces |
| Product Dimensions | 4 x 0.3 x 2.8 inches |
| Item Dimensions LxWxH | 4 x 0.3 x 2.8 inches |
| Color | Blue |
| Computer Memory Type | DDR4 SDRAM |
| Flash Memory Size | 500 GB |
| Hard Drive Interface | SATA 6 GB/s |
| Hard Drive Rotational Speed | 7200 RPM |
| Manufacturer | Western Digital |
| ASIN | B073SBZ8YH |
| Is Discontinued By Manufacturer | No |
| Date First Available | July 27, 2017 |
Y**A
Extreme Speeds & Performance .. Totally worth the investment.
In this review, I am going to rate the WD SSD 500GB. The review will be on four main criteria, and I will mention what I liked, and what I didn’t like about the product. Furthermore, I will also share my experience and how I got the product up and running.This review is very detailed, so if you just need to upgrade MacBook Pro, just scroll down to “Upgrade”.This review has been written on the day I had the product running. This review has not been sponsored by WD, and it is solely my own experience and tips I’d like to share.Price:No one can argue that this SSD is fairly priced. I can say it is definitely worth the investment. The value for money is just ridiculous.Quality:Even though this product will be stuck underneath the laptop case, but the plastic feels solid, and it came well packed.Speed:Using BlackMagic Disk Speed Utility, I got the result of 276.7 MB/s write and 504.6 MB/s read. Not quite the promised but good enough. Besides, since this is a 3rd party tool and not embedded in the operating system I don’t expect exact results.Performance:Generally, after replacing my drive, I found out that it made my mac at least 5-8 times faster. Moving large files is instant, starting applications and everything else is much quicker.-----------------------------Upgrade for MacBook Pro 13 inch ( Mid 2012 model - Non-Retina )~~~~~~~~~~I bought this SDD to upgrade my MacBook Pro 13 inch (Mid-2012 model). This Apple MacBook model is essentially the last model with the upgradable disk. Some other models are upgradable with M2 SSD. So, if your MacBook Pro is a mid-2012 or below, it is most likely upgradable.For non-Apple devices, you need to look up your model and check if this SSD is suitable. Amazon offers a handy tool to do so. This guide will only help for Macs.~~~~~~~~~~Disclaimer:I shall not be held responsible for any damages to the drives or loss of data as a result of your mistakes in the process. You are to do this upgrade at your responsibility, and you hold all the risks associated with the upgrade.*It is however advised to backup your data ( mainly the most important ) and to watch other tutorials to have a better idea of the procedure. This is only a guide with the concept of the procedure and is LACKING SOME STEPS.**Basic knowledge of how partitioning and how disk drives work may be important.~~~~~~~~~~Before anything, you need to decide the size of the disk. My original was a 500GB spinning drive (HDD), and I bought the 500GB SSD. If you decide that you need more storage, the OSX installation is skipped. Just keep in mind that this could be a major investment in your computer, so if you are left with something between 0-75 GB, you might want to consider getting a bigger sized drive.Step 1: Restart your Mac and press (CMD + R) to enter recovery mode. Go to desk utility and check your currently installed drive (should appear under internal), check the Partition style. Mine showed APFS, but it may be another like Mac OS (Journaled).Step 2: Take the new SSD drive and put it in an enclosure for USB connection. I used the AmazonBasics enclosure, the price and the quality are great. Plug it into the mac’s USB. The drive should appear under external.Step 3: Erase the new drive and format with the format identical to the original drive. (CONFIRM THAT IT IS THE EXTERNAL DRIVE). You can give the new drive any name but try to go for something unique so you don’t confuse it with the current drive.Step 4 A: If you chose an SSD with size larger than your current drive, you can just go back to the EXTERNAL drive in the disk utility and click restore. Then choose the current internal drive as the source. This will fully clone your old drive to the new drive.Step 4 B: If you chose an SSD with size equivalent or smaller than your current drive ( note: You can’t cram 400GB of data into a 250 GB drive), you need to go back to the main recovery page and click on reinstall OS. It will ask you which drive to install into for this case choose the EXTERNAL ( whatever you named it). It will then reinstall the operating system. Next, It will then ask you if you want to get data from another drive just choose the current drive (INTERNAL). Tick everything to get a full copy (Trash is not copied).Step 5: The time it takes usually takes a while depending on your data. After you confirm that the new drive is working fine, you can swap the drives. (You can find step-by-step tutorials on Youtube)——————Pros:It is Excellent. That’s it.Cons:Not sure if I should consider this as a drawback but more of a ”would behandy to have”. I think if WD supplied software to assist in the logistics of moving data, it would have been really fantastic. As an IT, I don’t trust free 3rd-party software, and if I went for paid software, it would cost high. Otherwise, there is absolutely none.Overall:I think this product is really great, it will give life to ancient computers, and I totally recommend it. You can buy it without hesitation.Other products you may consider (That I've been also considering, but haven't tried) :Sandisk UltraKingston A400
O**R
Good basic storage at a reasonable price
This gets five stars for what it is, a basic and reliable SSD at a reasonable price. I am sure there are SSDs that are just as good that cost less, but I like WD products. I used this SSD for storage and not for the operating system since I wanted something much faster than that (an NVMe). I don't worry about doing a lot of writes to this drive, because that was the intended purpose. Nothing on it is permanent storage and this SSD can fail without causing me much, if any grief.
M**.
Excellent SSD, blazing fast, instructions could be better.
Great upgrade for my Win7 Lenovo Thinkpad E530-C, which with a standard 260GB hard drive. It has only 4GB RAM and was glacially slow trying to run Office 2016, backups, Windows updates, etc. First the good news: with SSD installed, I'm seeing the following performance gains:Boot up: <1 minute, down from 3-4 minutes.Shut down: 30 seconds, down from 3-4 minutes, more if Windows updates were installing.Start MS Word: 5 seconds, down from 2 minutesStart MS Excel: 5 seconds, down from 1+ minutesStart MS Access: 5 seconds, down from 2+ minutesStart MS Outlook: 7 seconds + mail server sync, down from 2+ minutesPhotos: Instant load of 4-6 MB photo files, 30-150 MB video clips in Windows Live Photo Gallery - using Next/Prev arrow controls is instantaneous also.Stream video from Youtube, Amazon Prime, etc. also load and start noticeably quicker, I assume due to much faster buffering.Windows updates: These download and install in about 20% of the time with the SSD. One day after install, I went to shutdown and it downloaded and started to install 8 Win updates. Both download and install after next startup took only a minute or two.Now the downside: Cloning HDD to the SSD took much longer and was more confusing than it should have been, mostly due to rather sketchy instructions on WD site re the Acronis True Image WD Edition software provide for cloning. For some reason, you can't install the ATI WD version unless you already have a WD or Sandisk storage device attached--otherwise it stops the install. Fortunately I had a blank Sandisk Cruzer USB drive handy -- stuck one in and voila, ATI installed.ATI has two clone modes--automatic (recommended) and manual. Automatic clones all your existing partitions, and if you're installing an SSD with more capacity than your old HDD--I was adding a 500GB SSD vs my old 260GB--the automatic option proportionately increases all HDD partitions when cloning. I did not want my 30 GB Recovery partition blowing up to over 60 GB, so I went back and selected the manual cloning option, which allowed me to specify just enough space for the remaining files. It also let me move the recovery partition to the "end" of the partition sequence on the disk, which allowed the C: partition, where all the files go, to use all the newly available space. My C drive went from about 228 GB to 466 GB with the SSD. Awesome.Time to prep and clone the drive:3.5 hours to do a total Windows backup to external HDD1+ hours fiddling with the Acronis install3.5 hours to clone the drive<1 hour to open PC, remove HDD, install SSD, close PC.Total time: between 8.5 and 9.0 hours, most of it just waiting for stuff to happen. Your time may vary...I'm no pc hardware expert, although I know a bit and can follow instructions.The Acronis software interface is a little light on instructions and status updates both while setting up the clone and while cloning was proceeding. For example, the cloning status screen has a field for estimated time remaining, but it said "Estimating time remaining" when the cloning began, and it never updated with an actual time remaining.From what I've heard from others who've done SSD cloning and installs using other brands, my experience was typical. At least the WD SDD was recognized at the first boot after installation. I was forewarned to have another PC or tablet handy to access the web to get help if there was any incompatibility issue or BIOS problem.Most users would have to clone using a USB-to-SATA cable (I bought this one:https://www.amazon.com/gp/product/B00HJZJI84/ref=ppx_yo_dt_b_asin_title_o06_s00?ie=UTF8&psc=1)Most laptops have at least one USB 3 port--be sure to use that to speed the cloning up a bit.SSD is a great way to boost performance in an older laptop. This WD Blue is highly rated both on Amazon and other sites. I'm very pleased with it so far, despite the time involved in setting it up--it's well worth the trouble.
Trustpilot
5 days ago
2 weeks ago

![SABRENT 2.5 Inch SATA to USB 3.0 Tool Free External Hard Drive Enclosure [Optimized for SSD, Support UASP SATA III] Black (EC-UASP)](https://images-na.ssl-images-amazon.com/images/I/71J0iPYw2YL._AC_UL116_SR116,116_.jpg)