


Desertcart purchases this item on your behalf and handles shipping, customs, and support to Finland.
🔋 Power your ride, ditch the clutter—drive smarter, look sharper!
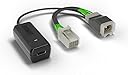
The Dongar Dashcam Power Adapter (10-pin Type D) is a sleek, plug-and-play solution designed for select MOPAR vehicles (2020+ RAM, Charger, Challenger, Grand Cherokee, Durango). It converts your rearview mirror’s 12V power to a clean 5V USB output, powering dash cams and radar detectors without unsightly cables or complex installation. Compatible with a wide range of USB devices, it includes multiple USB cables for universal connectivity, ensuring a tidy, professional setup that enhances your driving experience.


| Asin | B08B91BT9Q |
| Brand | Dongar |
| Color | black |
| Compatible Devices | Dashcam |
| Connector Type | 10 Pin Type D |
| Current Rating | 2 Amps |
| Customer Reviews | 4.7 4.7 out of 5 stars (468) 4.7 out of 5 stars |
| Finish | Matte |
| Input Voltage | 5 Volts |
| Item Weight | 0.08 Kilograms |
| Manufacturer | Dongar Technologies |
| Model Number | 10-Pin Type D |
| Nominal Power | 10 Watts |
| Number Of Items | 1 |
| Number Of Ports | 1 |
| Package Quantity | 1 |
| Power Plug Type | Type D |
| Specific Uses For Product | Car Audio & Video |
| Unit Count | 1.0 Count |
| Upc | 707568711309 |
User
Perfect!
Expensive but work like a charm on my 2023 rebel and with a Garmin dash cam.. highly recommended, look awesome!
User
Made 2021 Durango USB Dashcam install a breeze.
This adapter let's you power a USB device from rear view mirror power connector. It comprises a DC-DC converter (12v -> USB's 5v - the black shrink-wrapped thing), male & female Dodge rear view mirror power plugs, USB A socket plus USB mini & USB micro adapter wires. Makes easy, nice n tidy powering of USB devices near rear view mirror. Steps (YYMV - do @ your own risk, etc):1 - Gently pull down & toward you from bottom/bottom sides of large cover forward of rear view mirror. Mine detached easily taking down the narrow upper wire cover with it. No broken plastic hooks (as shown in photo), yea!2- Push tab up from bottom of Dodge black plug in back of rear view & slide out. Insert adapter's plug & socket as intercept for that wire. I wrapped mine w/one wrap of that thin green adhesive-backed felt and inserted it snugly in cavity above mirror stalk.3) Wiring is done. I wrapped the black module + extra wire with another wrap of green felt and zip-tied it to the metal bracket for rain sensor. Reattached front big black cover 1st then thinner wire cover from rear view -> headliner 2nd.Powers on w/accessory & while driving. Works great for me so far.BTW I'm very handy w/electronics, soldering, etc but no-brainer to use this thing vs buying small DC-DC converter, the USB sockets + adapters & somehow trying to neatly & reliably tap into wires, etc.
User
Easy (enough) install, complete kit, works well
First, do NOT buy the suggested right-angle dongles; this kit comes with 3 dongles, each with a different male connector, which is good, because the suggested ones I ordered were the wrong connector.I wish they would have clearly stated this; it would have saved me a few bucks.Also, your camera will only be powered on when your car is running or in accessory mode. If your camera is so equipped and you want it to be usable as a “parking monitor”, this is not the kit for you.The kit comes with an orange, plastic trim tool that made removing the cover off my 2024 Ram’s rearview mirror easier.Following are top tips for 2024 and later Ram 1500 owners: the rear view mirror cover is in 2 pieces (a top and a bottom); removing them is the most challenging part of the install, but it’s not too bad. Read on for a good method to use.Note, the upper cover has a small section that slides down very slightly from the head liner; slide it down.Remove the top piece first, by slipping the small end of the tool into the lower edge of the top piece (about an inch or so up from the bottom edge) and pressing a tab (which you can’t see…) and pulling gently but firmly down. It’s not too hard to find. After getting one side done, do the other.Then, use the same tool to help gently, yet firmly pry the lower cover down towards the dash. If you jiggle the cover, you will see where the resistance is, and it consists of two “bayonets” and slots, one on each side of the mirror stem, that you must uncouple.That’s the “hard part”. After that, unplug the mirror by pressing the tab of the plug up and pulling the plug. If you look at the part that will be plugged in from this kit, it will make sense.Then re-terminate the mirror plug into the adapter, find the correct dongle from the 3 choices, plug it in to the USB and then your camera, power on your car’s accessory mode, and test your camera.Don’t adhere the USB port to your window yet!After confirming function, tuck the wires into the lower cover, making sure to feed the red and black wires thru the small slot on the side (Ram must have anticipated this), line up the “bayonets”, and press the lower cover into place.Line up the tabs on the upper cover and press them into place, then slide the “movable” part of the cover towards the headliner until it’s flush. Find a good spot to adhere the USB port and you’re done.
User
Works well on Jeep grand cherokee
Wow.. such a easy setup for connecting dashcams to your GC. No long works and very very clean setup
User
Works perfectly
This company is amazing and it's a great valley for the money for your dash cam. The cable length is perfect it is compatible as it describes. Connectivity is pretty good and seems to be doing good in the heat too.
Trustpilot
2 days ago
1 month ago