🌊 Keep it dry, keep it stylish!
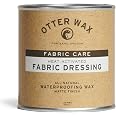
Otter Wax Heat-Activated Fabric Dressing is a 100% natural waterproofing solution designed to reproof oiled cotton jackets and other fabric items. Handmade in Portland, Oregon, this eco-friendly dressing is free from toxic chemicals, silicone, and petroleum, ensuring a safe application for both you and the environment. The generous 1/2 pint can is perfect for a variety of uses, from jackets to backpacks, providing a factory-waxed look with ease.
Item Package Dimensions L x W x H | 2.91 x 2.68 x 2.6 inches |
Package Weight | 0.27 Kilograms |
Item Dimensions LxWxH | 3 x 3 x 3 inches |
Item Weight | 8 Ounces |
Brand Name | Otter Wax |
Material | All-Natural Waxes & Oils |
Suggested Users | mens |
Number of Items | 1 |
Manufacturer | Otter Wax |
Part Number | 0015 |
Style | Adhesive |
Size | 7.95 Fl Oz (Pack of 1) |
L**N
Works great, it is hard to apply....
You have enough time with a brush to get the wax on to the garment, and a little spreading, but it will harden fairly quickly. A few pointers, warm the garment (about 10 minutes in the dryer), use a heat gun (this will be better than a hairdryer), keep the area you are working on, warm, wiht the heat gun. Keep the brush warm with the heat gun. Spread and spread and spread. Use your hands (they'll wash right up with Dawn dish detergent), spread and spread. Use the heat gun and get as much of the wax in the garment as possible. Stand back and say - "WOW, that looks like crap!" Now, put it in the dryer for about 30 minutes. (be sure to dry a load or two of towels after this). Now - stand back and admire your work. It will come out great.Just spreading the wax on the garment is going to take a good 90 minutes, probably more. Trying to get the wax to soak in with a heat gun will take forever. Drying it in the dryer for 30 minutes - that takes about 30 minutes and really spreads the wax out nice and even. The garment I did (a surplus OD Green field jacket) took the wax pretty well, but it was still too thick. I dried it for about 15 minutes, then turned everything inside out, did another 15 minutes and it looks great.
A**R
Fun project!
I made a pair of size 8 women’s “tin” pants (as they called them back in the 1500’s). I got nearly all the way thru with a generous coating when I ran out for the last little bit. Only then did the can sitting in the hot water give me trouble as my large brush caught the tip and turned my can. Wax heats quickly and it wasn’t as messy as I thought it might get. Smell is subtle and fresh. I can see myself using this again.
J**C
wonderful results, not particularly easy
Like a home fixit project, a cotton waxing project will take twice as long and require twice as much product as you think it will. Even if you accommodate for that prediction, it will still take twice as long and twice as much!I had to order a 2nd tin to cover an XL Levi's cotton jacket.A few tips that may help you:1) for unwaxed, untreated cotton, you will use a liberal amount of wax.2) the application effort is trivial and quick compared to the permeation effort3) a hair dryer or heat gun or maybe an old iron is absolutely necessary4) a smooth silicone oven mitt will prevent you from finger discomfort5) you will likely make 3-4 passes over every square inch of exterior fabric6) the exercise is manually pressing warm wax into cotton fibers, don't let anyone tell you otherwise7) waxing a garment is not a clean, neat, or precise operation.8) results were wonderful, easily as good as "professionally waxed" items.9) It has to cure, think 3-4 days, not a couple of hoursMy method: the wax cools crinkly like candle wax, so work in small sections. wash/dry/delint garment and heat wax in water as directed. You don't need the entire tin to be liquid, merely enough to absorb into the brush. Use brush to liberally apply, wax will cool quickly. You have about 7 seconds to get it from brush to fabric. Don't worry about permeation at this time, just get the wax onto the garment and approximately cover it. After your section is covered, put tin back in warm water for next section. Manually force permeation by heating a small section of the crinkly wax with a constantly-in-motion high-heat hair dryer (do not heat to evaporation). I found that a heat gun would evaporate too quickly. With a circular motion and reversing at times, use your silicone gloved fingertips to "grind wax into" the fabric until no more white blobs of wax appears in the heated area. Keep your grinding efforts in the heated area otherwise you will cause cool wax to become white and then you have to heat and rub that wax as well. You can force permeation with mere fingers rather than silicone, but it hurts and takes longer. The material will look and feel almost leathery after successfully forcing permeation (until after curing). To ensure full coverage, visually inspect for empty areas as you rub wax in and apply more wax from warmed tin if needed. Repeat, paying special attention to seams, edges, buttons, etc.Hang garment for 2-3 days for curing. It may appear to have a white dusty haze after curing and you will see crinkles, this is okay.
K**C
Pretty good
I used this to wax a brand new lighter weight inexpensive solid matte black coloured cotton jacket. I was hoping for water resistance and a nice even subtle silky black appearance maybe something like a Barbour though if it looked more like a Filson that would be fine too. Took a while for me to get the wax melted in the pot of water, probably would have been better on a gas stove, rather than electric, as the heat would have been even that way. Used a meat thermometer that I held with the probe off the bottom of the pot to ensure proper 180 degree water temperature. I applied the wax from the can still in the pot being heated on the stove to the coat a foot or so away with a new paint brush. It solidifies quick. I was rushing things a little and just quickly slopped on the wax to cover everything. the entire coat took the full can, though no more. I let it rest a few minutes then got out the hair dryer and used it to melt the wax until it was soft and then worked it in with a wooden shim that I had sanded down and rounded off. Made sure to work the wax into the seams, pocket pleats, and moved it around from areas that had been more heavily coated to those that were less heavily coated. Had lots of crumbs of wax that had blown off stuck to the side of the coat that was down on the tarp last. Flipped the tarp over, put the coat back down and began to melt the wax on the coat again and as I did I thoroughly and spread it around with a wad of old freshly laundered cotton T shirt. Certain areas like the top pocket covers looked good, like I was hoping the whole coat would turn out. Even the fabric on the chest above this looked like that, at the time. Did the whole coat like this. Beginning to end took about 4.5 hours. Then I hung it up to cure and let it set there for 72 hours. Only after that did I put it on. As soon as the fabric flexes it gets pretty chalky looking. Again the material above the top pocket flaps looked exactly like them and then that material flexed a little and turned a chalky grey. It's not the aesthetic I was going for and I'm not super happy with it, but OK it's not awful. My wife thinks it's awful, though, whetev. Stood out in the pouring rain with it today for 10 minutes. Watched the water sheet right off the whole time. I stayed completely dry. So it seems to have achieved the level of water resistance that I had hoped for. That is great! Very satisfied there. I'm thinking the aesthetic I desired is achievable, though I probably should have taken more time and watched the companies instructional video once or twice more as I was doing it. Also not having a needy 4 yo and 9 month old in my immediate care while I was doing it probably would have helped a lot. I'm guessing I over applied the wax and should have taken time to work each paintbrush application into the fabric as I went rather than brushing the wax on everywhere quickly and then melting it in and moving it around. I probably could have used 3/4 can and achieved a more even factory looking finish. I'm not worried about this as the item functions and the wax will need to be touched up re-applied in a year or so at which time I'll have another chance to make it look more like what I had wanted. I may try the bar for that touch up. So long review, in the end i'm very satisfied and would recommend the product. All in, jacket and wax, I've spent $42 and have a fall/spring coat that is durable and usable with some character and that I'll change the appearance of in a year or two when re-waxing; I'm putting this one in the win column.
Trustpilot
5 days ago
2 months ago