❄️ Keep your Raspberry Pi 5 cool, calm, and collected—because overheating is so last season.
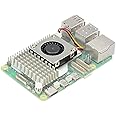
The Raspberry PiActive Cooler for Raspberry Pi 5 combines a single-piece anodised aluminium heatsink with a temperature-controlled blower fan and spring-loaded push pins for easy mounting. Pre-applied thermal pads ensure optimal heat transfer, making it a lightweight, efficient cooling solution designed to maintain peak performance and reliability for your Raspberry Pi 5.


| Brand | Raspberry Pi |
| Product Dimensions | 6.5 x 0.65 x 3.3 cm; 20 g |
| Item model number | SC1148 |
| Manufacturer | Raspberry Pi |
| Processor Brand | ARM |
| Processor Count | 1 |
| Memory Technology | LPDDR4 |
| Computer Memory Type | DIMM |
| Operating System | Debian |
| Are Batteries Included | No |
| Number of Lithium Metal Cells | 1 |
| Item Weight | 20 g |
| Guaranteed software updates until | unknown |
M**R
The beast!
Flies along with an NVME hat and cheap ssd. No need to buy a super-fast one as it only supports pcie2.0
N**D
Does good
Plug and play, works perfectly. Very easy install, tricky to dismount but not impossible.
V**I
Great fan for your RPi5
Great fit, very silent fan. The big heat dissipator helps with RPi5 overclocking. It integrates perfectly with the OS returning realistic RPM values. I would recommend it over the standard case-issued fan
P**R
Cool!
Snaps easily in place and keeps your pi5 nice and cool.
P**K
Excellent solution
Good design and price. However, if you buy the official case that has a small heat sink, you will not be able to fit this, as removing the heat sink will damage the Pi5.
B**B
Good value
Excellent fit and works well.
N**N
Silent in Normal Use
The fan speed is controlled using the CPU temperature an in input.In the open air at idle, the fan does not run.In the open air working hard, building the Chromium web browser on all 4 cores, the fan spins at the lowest speed and remains silent.Users that want to set their own fan speed breakpoints can do that too, with a line in config.txt
B**T
Nearly inaudible
As long as you remember to plug in the fan first, installation is a breeze. Disconnect the stock heatsink and push the two plungers. It allows for the m.2 hat to be fitted and then quietly keeps things cool.
Trustpilot
2 months ago
1 month ago