🛠️ Fix it like a pro, without the pro price!
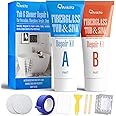
The Tub, Tile and Shower Repair Kit by Hupeyna is a comprehensive solution for restoring damaged bathtubs, sinks, and tiles. This versatile kit allows for repairs of chips, cracks, and scratches on various surfaces, including porcelain, acrylic, and fiberglass. With a range of color options and easy application, it provides a cost-effective alternative to professional repair services.
T**3
Fixed Chips and Holes
Use very little pigment to start, a pin drop, then add as needed to match your color. For holes in tiles, I filled them in with spackle, let them dry for a day, sanded, then covered with the epoxy. I cannot tell where they were. Great product, just follow the directions.
S**M
Works really well, and surprisingly easy to use (even for beginners)
We rent our home, so when a wine bottle came tumbling out of the wine rack over the fridge and cracked a floor tile, my heart sank because I knew that our security deposit would probably be history. My dad told me I was probably overreacting and that I should look into tile and repair kits. I spent a lot of time scouring DIY sites and Amazon product listings, and after all that research, this one seemed to be the easiest to use, one of the most highly rated, and affordable. So I crossed my fingers and ordered. Even though it arrived within a couple of days, I've been putting off the repair for weeks because I was petrified that it would require a lot of work and that I'd ultimately ruin the tile or make the crack look even more noticeable. Yesterday, I finally took a *crack* at it (see what I did there?) :) And boy, was I wrong!First of all, despite the fact that there is some mixing involved (you need to squeeze the products from each of the 2 tubes into a cup and mix together for 1 minute, then add any of the included coloring agents to help match the color of the tile, then mix a bit more), it was incredibly easy to use. The overall setup time was negligible (2-3 minutes tops), since they include just about everything you need in the box (except for a container in which to mix the product, like a cup or bowl).The overall application process was also unexpectedly quick and easy, and the directions were clear and direct (even for a novice DIYer like me). Simply scoop the mix onto/into the crack to fill, scrape away any excess, smooth out the surface, let dry for 24 hours, then sand to smooth (if needed).The end result looks shockingly good. The photo I've attached with this review is only the initial result after a single application. The directions say that particularly deep cracks (like this one) may need an additional application, but so far, I've only had the time to complete one. It's not yet perfect, but it's a LOT less noticeable than it was a few days ago.TIPS: I found the coloring agents to be rather tricky work with. Our tile is that ubiquitous greige color (which I personally hate), so it was difficult to match with the coloring agents provided in the kit. As the directions say, take your time when mixing in the dyes, because the slightest dab makes a huge difference, which I discovered the hard way. But even if you get the color right where you think you need it, it'll still stick out like a sore thumb once applied as a solid color to tile with a marbled finish (like ours). To help it blend in, I purchased an inexpensive greige-colored grout pen and dabbed it on the patch, then quickly smudged it with a paper towel to achieve a marbled effect. You'll notice in the photo that it's not perfect, but it was also just a "trial run" to see if my grout pen solution might actually work – as such, I decided to play around with the grout pen BEFORE adding another application of the tile repair, so that if my DIY marbling effect didn't turn out well, I could just cover up my mess with more resin and no one would be the wiser. To my surprise, the effect was surprisingly effective, although I'll need to purchase a secondary grout pen in a creamy-beige color to compliment the grey and balance it out/help it blend in a bit more.But even if I were to leave the repair as-is without adding another coat, I'm AMAZED at how well this repair kit worked. When the lighting is just right, you can still see the crack if you look for it, but it otherwise blends right in, which is exactly what we were hoping for!HIGHLY recommended!
D**V
Highly recommend for cracked floor tiles!
Works so well! Make sure you color match really well from the beginning. The mixture dries the same color as when it's wet. A little color goes a LONG way so make sure you use the toothpicks to add it in. I had about 6 cracked tiles and a missing chunk that I filled, and you can't even see them without searching for them now. The only thing I wish this product provided is a mixing container.
E**Y
Exactly what I needed
Worked great and as described! I could not be happier with how it turned out! My only notes would be - it gets real sticky real fast so work quick. Also make sure you wear the gloves it isn’t fun to get off your hands. Lastly black is strong so if you need a lighter color like gray make sure you use very little black. Whatever you think you need use less than that. I had to remix 3 times to get it perfect but they give you plenty and I still have a ton!
T**
No good
Very bad , damaged my tub
R**.
Easy to use. Maybe not for shiny tiles
Easy to use. Struggled to get product to blend on shiny tile- but at least it covered the original crack
D**J
Works well
Pretty easy and worked very well on a chip in my laundry room tile. It was pretty easy to get the color right and I used a spare tile to test the color before application.The attached photo is of the area repaired. I doubt you can find the damaged area.
T**E
Not true white
Works great and much better packaged and easier to use than the kits that use tubs.Tints are ridiculously strong so mix the tiniest amount possible with a little of the base material and then mix that with more base material slowly to get a color match.This would be a five star product if it was actually white. It is off white with a brown base, so matching anything that is not brown based to begin with is not realistic.I used it for repair of large areas of an old cast iron tub that was damaged and the repair has held up well, almost as tough as the original enamel.If you are doing a large repair area, leave the patch thick at the edges, as any cast iron underneath will flash through and you will be able to see it if you go too thin.I sure wish I could find this product in true white, I would use it for all kinds of things!
Trustpilot
1 month ago
2 weeks ago