🧩 Transform your clutter into curated calm with Titanium-grade versatility!
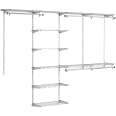
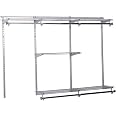
The RubbermaidConfigurations Deluxe Custom Closet Kit is a premium, adjustable metal wire shelving system designed to fit closets 4 to 8 feet wide. Featuring a durable titanium epoxy finish, it offers rust-resistant, snag-free storage with modular shelves and telescoping rods that can be easily installed and reconfigured without tools. Ideal for multiple spaces, this kit maximizes storage capacity with included hardware for a seamless, customizable organization experience.


| Unit Count | 1.0 Count |
| Item Depth | 3.125 inches |
| Item Weight | 43.4 Pounds |
| Item Dimensions | 49.25 x 13.75 x 3.13 inches |
| Mounting Type | Freestanding |
| Material Type | Aluminum |
| Finish Types | White |
| Color | Titanium |
C**.
Extremely Flexible Closet Organizer Kit
**03/07/22 UPDATE**I installed a second one of these in a larger closet. Same situation, tore out old basic shelf, did all drywall repairs and repainted closet walls and ceilings. Like the first closet I did, the hang bar was done at 80" vs the 86.5" that is recommended. This worked out perfectly, again.This time, I did not use any of the included anchors -- for places that required them, I exclusively used toggle bolts I picked up from Lowes. Yes, it cost a few bucks more but the peace of mind is worth it. The hang bar and uprights are not going anywhere!My wife has already hinted I will be installing these in other closets if that is any indication as to our satisfaction with this organizer. The single "ding" against is that the included anchors are, well, crappy. No other way to describe it. Like I said in my original review, the bang:buck ratio for this organizer is super high. Very much recommended.**I completed the installation of this closet organizer kit this weekend, so wanted to share my experiences while it is still fresh in my mind.Other reviews have gone over all of the features of the kit, so I won't bore you with that. However, I did want to provide some handy tips for installation -->- Prior to beginning the installation, I tore out the old shelf + cheap-o anchors, did all of the drywall repair and finally painted the closet walls and trim. This is obviously not necessary and takes extra time, effort and money but it really made the end result look so much better. Very much recommend going this route if you are tearing out an existing system.- As several other reviewers have suggested, buy some toggles or heavier-duty anchors. The included ones are not horrible, but the chance of hitting studs for the uprights to achieve an optimal layout is pretty low and I would prefer to spend an extra $20 on hardware and know the system is solid.- Read the instructions + watch the brief install video several times and plan your layout prior to beginning installation. There are some great tips (like using the rail cover as a spacer for the uprights) included that will make things much easier.- Both the video and paper instructions tell you to mount the hang rail at 86.5" -- this is in no way, shape or form a requirement. I mounted mine at 80" and it worked out perfectly. The trim in the closet is 6" high, and the upright extensions end up about 2" above it. Perfect.- Take your time. Use a level. Use a stud finder. Measure again before drilling. Yes, simple/silly tips, but you might as well aim to get your installation (at least of the uprights) done right the first time. The shelving/accessory side of things is super flexible post-install, but if you go wild-wild-west with your uprights install, you're likely going to have a bad day.- Overall, the installation was not crazy difficult. Anyone with average+ abilities (and the right tools) can totally knock this out alone and get a good result. If you aren't comfortable with the install, find a handy pal and make an afternoon/learning experience out of it. I can safely say that no advanced skills are required to get a great end result.So, big question here.. would I buy the kit again? Yes, for sure. In fact, my wife has already asked I begin planning the layout for a closet in another room. The single thing I would do differently is to not use any of the included anchors at all and use 100% toggles. The included screws (for sinking the rail into studs) are good though!In closing, let's be clear -- this is not a high-end solution. It is, however, a solution with incredible bang:buck that offers some great flexibility given what is included in this kit and the number of accessories out there. The end result (especially after painting the closet to match the room) looks outstanding and all-in was south of $200 including replacing my old 20-year-old stud finder and a new gallon of paint.Have questions? Feel free to ask and I'll do my best to answer.
C**.
Awesome closet configuration system
I have a walk-in closet and heard a crash only to find my previous rack had collapsed under the weight of clothes and storage containers. I was super bummed but man, this turned out to be a blessing in disguise.I bought 3 of the 4-8ft white systems for the 3 walls of my walk-in closet for $96 each...what a steal! I installed all 3 in one day with the crucial help of my teen son. These things are incredible and seem super sturdy.Key takeaways/learnings:- Follow the instructions carefully.- Critical that you install the hanging rail into every stud you can find. Get a stud finder. Solid installation of the hanging rails is crucial. Be careful screwing into studs with a drill. As difficult as it was, I screwed in by hand to avoid stripping the screw head. However, I’m strong and have really good, torquey screwdrivers that allowed me to do that. Get a helper to install the hanging rails if you’re putting in more than 1.- USE THE SPACERS that come with it. I measured the distance between the uprights at first, but it’s so much easier to just put the spacers in place for perfect distance.- Think carefully about where you want the uprights if you know they will be unevenly spaced on one side. Two of my installations were like that and you want the uneven side to be the less accessible side.- Get your own, higher quality drywall anchors. I got the kind that screw into the wall and they’re WAY better than the ones that came with the system. Screw in by hand...DONT use a drill.- Buy extra wood screws in case you strip some going into studs. Likely to happen.- This is key. Don’t agonize about trying to envision the right configuration. Just pick one and start loading up your stuff and then ideas will flow as to how things should change. My wife and I reconfigured probably 5 times with our stuff in it til we found the perfect setup. Reconfiguring is super easy!This is a bit of a project, but SO worth it. I spent $300 for 3 systems and completely decked out my walk-in closet where some people spend thousands for something “fancier” and not even close to as functional. My wife was amazed at how easy we could reconfigure and the amount of extra space was unbelievable. This was one of the best finds I’ve had in a long time.
Trustpilot
2 days ago
2 weeks ago