💧 Pump up your hydration game with silent, smart power!
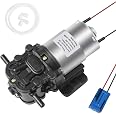
The HuiYu HY-D23130 is a compact, 12V DC water dispenser pump delivering up to 1.6 liters per minute with a max pressure of 35 PSI. Featuring a self-priming function with a vertical suction lift of 6.5ft, it ensures flexible installation above water tanks. Its built-in pressure valve safeguards your equipment by auto-cutting pressure, while rubber mounts minimize noise and vibration. Complete with all necessary accessories, this lightweight 500g pump is engineered for easy, reliable integration into water coolers and ice makers.
Brand | HuiYu |
Color | Black |
Material | Plastic |
Product Dimensions | 4.93"L x 3.1"W x 2.38"H |
Power Source | dc |
Item Weight | 500 Grams |
Maximum Flow Rate | 1.6 Liters Per Minute |
Maximum Lifting Height | 39.37 Inches |
Voltage | 12 Volts |
Style | Protection |
Manufacturer | HuiYu |
Part Number | HY-D23130 |
Item Weight | 1.1 pounds |
Item model number | HY-D23130 |
Is Discontinued By Manufacturer | No |
Item Package Quantity | 1 |
Batteries Included? | No |
Batteries Required? | No |
K**J
Replaced my bottom dispensing Primo water dispenser pump and works great!
The pump on my "Primo hTRIO Bottom Loading Hot/Cool/Cold Water Dispenser with Single Serve Brewing"(601240-B) started dying after two years. It would make some noise but no water would be pumped. I bought this pump without knowing how I was going to install it. This pump works great and it took about an hour to install. I will update this post if it stops working and I will put my install instructions here because I wish I could have read this beforehand:1) unplug the dispenser2) take water jug out3) unscrew the two screws holding the broken pump to the dispenser4) disconnect the water lines going to & coming from pump. Mine has sharkbite clips. To get them off, take off the little blue clips first, then you need to push the waterlines towards the pump & while holding the sharkbite clips tight pull the water lines out. It is hard to explain how to do this, hopefully you can google how to release a sharkbite fittings and find a solution if you are struggling. If you just can't figure it out, you can cut the water lines at the point they enter the sharkbite connectors and use the metal ties that come with the pump. I didn't test the metal ties so I don't know if they will work but I don't see why not.5) At this point the pump should be hanging by the two red & black wires only. Cut those wires about an inch from the pump. Originally, I took off the 2 back panels from the dispenser to see if I will be able to wire it up at the top. It isn't possible (maybe possible, but certainly not easy) so don't bother taking off the back panels of the dispenser.6) At this point you should now have the pump disconnected and holding it. This means you no longer need to be on your back with your head and shoulders jammed into the dispenser bottom. The broken pump should have the sharkbite fittings attached to it. Take both of those off like in step 4, and set them aside so you can use them on the new pump.7) Take the new pump and cut off the the connecter at the end of the wires (can't use it. You only need about 6-12" of wire out of the pump). Then, strip the ends of both wires. You need about an inch of exposed metal wire on each of the wires. At this point you can attach the two sharkbite connecters to the new pump. Take off the red caps that are on the new pump and just slide the sharkbite connectors onto the new pump and then add the little blue clips onto the sharkbite connectors. Give a little pull on each sharkbite connector to make sure it is tight.8) Strip about an inch of the two wires that are hanging down into the bottom of the dispenser. You should have the two wires hanging down with an inch of exposed metal at the end of each wire as well as the water line hanging down.9) Screw the new pump into the same place as the old pump was in using the two screws you removed to free the old pump.10) Splice the red wire from the new pump to the red wire hanging down from the dispenser. Give them a good twist and use a small wire nut to protect the connection. Do the same thing with the black wire. If it's easy and there is enough slack, push the wires up into the hole to the second level of the dispenser so the wire nuts are out of the way so you don't need to be super careful when changing the water jug.11) Attach the water lines to the new pump by pushing them into the sharkbite connectors and put the blue clips back on to the sharkbite connectors.12) Plug the dispenser back in.
A**L
Perfect replacement!
Worked absolutely perfectly for our water dispenser!
S**B
Fits our bottom loading water dispenser.
Our Primo® Water Htrio Coffee K-Cup Water Dispenser Bottom Loading, Hot/Cold Temperature pump crapped out on us after years of use. This pump replaced it and works like a charm. Way cheaper than buying a new dispenser. Highly recommend.
E**N
great price...works great!
exact replacement to original (10yrs)... just as described. I have an older unit and the plug was different but it was a simple transfer. Runs strong and quiet. Hope to get years of service.
J**.
Easy install
This replacement water pump is fantastic. It was super easy to install, runs quietly and has plenty of suction power to bring the water up from our bottom feed water dispenser. The automatic shut off works just like the OEM part from our Primo water dispenser had worked prior to going out. We have had this pump installed for about two months and we haven’t had any issues with it.If your having issues with your water machine not dispensing water, try replacing your pump with this one; it saved us about $250 because we didn’t have to buy a new water dispenser.
T**N
Perfect fix to existing bottom loading water dispenser
The pump works perfectly with the Primo Bottom Loading Water Dispenser Model 601088.This is a good deal comparing to a whole new dispenser at around $200.The wire of the pump is shorter than that of the original one, so you may need to rearrange the wire to find the shortest path from the pump to the main circuit board.The socket that came with the wire is compatible with the main circuit board.
D**H
This pump really sucks!... In a good way!
This is the second Primo water cooler that has gone out at the 2-year mark. First time call Primo they said they would give me a good deal if I just bought another one, so I did. This time I called them I got the exact same wording so obviously it's a script. This is not an on common problem. But I was not putting out another $200. So what did I have to lose to try this little pump. So glad I did. I followed most of the instructions given in a previous review. Except when it came to cutting the wires. Why would I do that? It would void the warranty. We took off the condenser coils in the back lifted them up gently. Notice that there were a few screws in the plastic casing on the top and you could actually see the metal box that held all the wiring so we removed those screws and then took out the screws in the metal box and there was the wiring all we had to do is unclip the old one clip in the new one after we ran the wires up through the bottom and went through the heat shield. We had to clip the zip ties to insert the new wires then just either zip tie them or tape them back in place. Took us about a half hour and it works perfectly.
R**L
Failed twice
Unfortunately, this only worked for a well before it died. I purchased two of them thinking I just got a lemon but it was back to back. I wouldn't recommend this one.
Trustpilot
3 weeks ago
1 day ago