
DOWNLOAD THE APP


Customer Services
Copyright © 2025 Desertcart Holdings Limited
DOWNLOAD THE APP


🛠️ Build Bold, Work Strong: The Ultimate Steel Workbench for Makers Who Mean Business
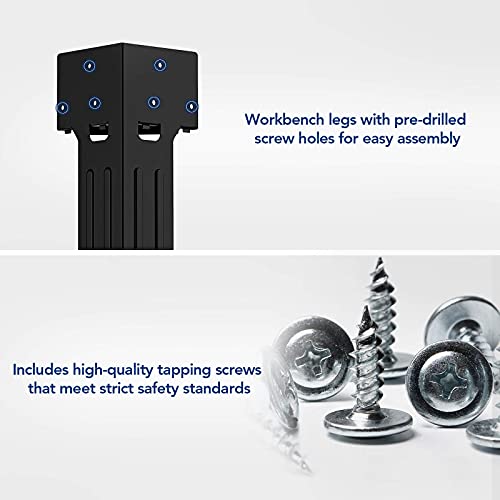
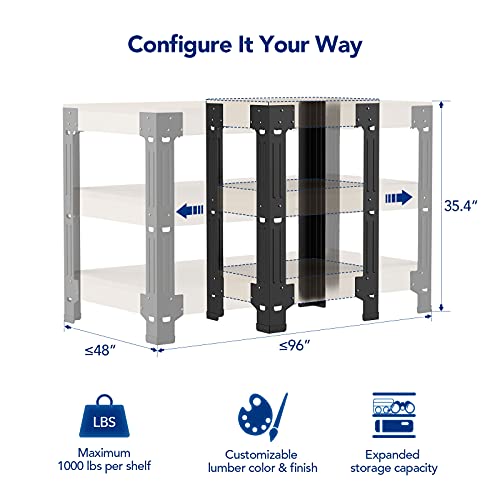
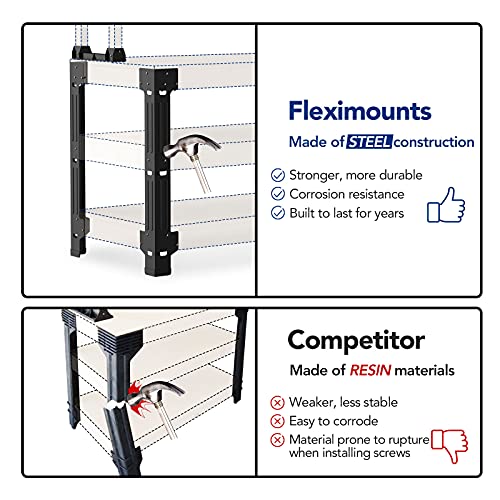
The FLEXIMOUNTS Steel Workbench Leg Kit offers a customizable, heavy-duty steel frame that supports up to 1000 pounds per shelf. With pre-drilled legs, included hardware, and rust-proof alloy steel construction, it’s designed for easy assembly and long-lasting durability. Perfect for professionals and makers seeking a reliable, tailor-made workspace up to 8 feet long and 4 feet wide.


| ASIN | B08XMJ2Q8F |
| Assembly Instructions Description | Assembly required. Easy to follow instructions included. |
| Assembly Required | Yes |
| Base Type | Leg |
| Batteries required | No |
| Best Sellers Rank | #74,430 in Tools & Home Improvement ( See Top 100 in Tools & Home Improvement ) #61 in Workbenches |
| Brand | FLEXIMOUNTS |
| Color | Black |
| Customer Reviews | 4.6 4.6 out of 5 stars (697) |
| Finish Type | Steel |
| Finish types | Steel |
| Frame Material | Alloy Steel |
| Item Weight | 20 pounds |
| Item model number | WB107A |
| Load Capacity | 1000 pound |
| Manufacturer | FLEXIMOUNTS |
| Material | Steel |
| Minimum Height | 35.4 Inches |
| Product Dimensions | 48"D x 96"W x 35.4"H |
| UPC | 810054076254 |
B**S
perfect workbench
I used this for my CNC bench. I put a 2x4 onefinity cnc on it, and i keep my 3D printer on it. I made the bench 4x8. It was easy to build and solid. When you get that long, you can get some sagging in the middle if you lean on it, but thats a lumber problem not this product. Great look. great quality
R**W
Makes building a nice work bench that is very easy and inexpensive
I have two of these and they are great for the shop or garage. Makes building a nice work bench that is very easy and inexpensive. I have mine loaded with hundreds of pounds of things, holding up just great.
S**.
I liked it so much I had to buy a second one.
These stands are perfect for making a custom corner work bench. I was able to get mine to fit perfectly between the garage walls and the stairs to enter the house. I used 2x4's for the framework of the bench and screwed those frames to the leg stands. Then I put sheets of 3/4" melamine board over the framework. I decided to put some drawers on the bottom after I dropped something under the bench and had to poke around with a hockey stick to get it out. The drawers now prevent things from rolling under the bench and are ideal for screws/nails/ bits storage. After being so pleased with how the corner bench turned out, I ordered a 4-leg set and made a second bench for more storage and working area. The legs are very sturdy, strong and great quality. They have ledges in their corners that each level can rest on to make screwing the 2x4's on very easy. Very happy with how these worked out and who knows maybe I'll even get a few more in the future. 100% would recommend especially if you are trying to fill a space that has specific dimensions. With these you can make any size bench you'd want.
L**Y
Easy way to make a sturdy workbench
This framework makes it pretty easy to create you own self-designed workbench. I needed one for a new workshop area and the system allows you to make it as wide and/or long as you need. In my case it's 3'x7' and has a bottom shelf. The height is pre-determined by the brackets supplied. The design utilizes 2x4x whatever length you want lumber allowing you to make it to your specific needs. It also allows you to purchase affordable lumber at your local lumber place. The system's directions called for a long 2x4 to diagonally from one corner to the other corner on the top frame to give some support to the plywood top. I didn't like that so I added a couple of 2/4 cross beams for the support and it works great. I also bought the shelf system but was disappointed with it. I knew it was a smaller size lumber and thought it would have been a 2/4 ripped down the length for consistency. However it wasn't and it wasn't even a nominal size the lumber yard carried. I haven't attached that yet. That is why I gave it a four star rating. My workshop isn't complete and the pictures reflect that. I'm waiting on a HVAC guy to come tomorrow and install a dryer type vent because I'm using this area for my 10W hobby laser and it creates some smoke and fumes. Would I recommend it? Yes, but not as enthusiastically as I would have if the issue of the lumber for the shelving had been better suited to the consistency of the rest of the build. There are other ones out there with this same system but they are made out of a hard resin and this one is made out of sturdy metal and I like that.
D**R
What it really costs to do this job
I ended up ordering these legs twice as the first order was damaged in shipment and on the day it was "out for delivery" it was mysteriously "returned". This was quite the letdown as I was in the process of moving from the US to Mexico and I would be needing a workbench in my new home. It took over a week for Amazon to tell me that I had to order again, that they could not just automatically re-send the product. By then I was in Mexico and I will still have to return to the states to pickup the legs from my son's home. I am a 75 year old, emphasis on the word old, man who is retiring to Mexico to live near the beach. I no longer will have a garage as I'm moving into a second-story, two bedroom apartment. The second bedroom is my "office" now.. There is an 11 foot long wall that allows me to have a 3 foot wide workbench and still have room to get around. So that is what I am building. I elected to buy the version with the two extra shelves on the top, regardless of the issue with the size of the wood needed to support those shelves. I will solve the problem a different way. I purchased three 4x8 sheets of 1/2" (or 5/8") plywood and had one foot cut off the long side leaving the three sheets at 4x7. I then had all three pieces cut down to 3' x 7'. This leaves me with three strips 11 5/8" x 7', of which I will need two for the top shelves. Seven feet of 1/2" plywood is pretty flimsy, so I will use the third piece between the two shelves to provide a back for the lower shelf, and bracing the entire length of both shelves. As for the three pieces that are 4' x 1', I really haven't figured out a use for them yet; but I primed and painted them just as I have for all the other pieces. For the 2x4s used to support the plywood sheets, I cut them each to length with 45 degree angles on each each. I initially bought a mitre box and mitre saw from Home Depot (yes, Mexico has Home Depots); but this turned out to be impossible work for an old man. I returned that and purchased the cheapest 7 1/4" circular saw and will include that in the cost to build as it had to be done. Obviously, if you already own one, it won't be costing you anything. I had a drill but had to buy two bits to pre-drill the holes for my screws. I used 2 1/2" number 8 screws. I also had to buy a battery powered screwdriver as doing this many screws by hand would be a chore to say the least. Again, if you own, this won't cost you. After everything was cut to size, the initial cuts on the plywood done by Home Depot (not free in Mexico as it was in America; but, not expensive either) and the mitre cuts complete on the 2x4s, I primed everything with "123 Killz". I calculated everything to be 180 square feet, and I purchased a gallon. I was left with less than an inch in the gallon, so pretty close calculation. When it came to the color paint, I calculated the visible surfaces only to be 142 square feet, so again, I purchased a gallon. 3 quarts would have cost more than a gallon. Oddly enough, I used about half of the color paint, and I painted all surfaces as I had with the primer, twice. Clearly the primer soaked in and did its job making the color coverage that much better. I picked a brown color and a matt finish. The legs have finally been delivered back in San Diego and I will return there this weekend for a birthday party. There must be six or seven other Amazon orders waiting for me, too. Everything is assembled and painted and waiting to have legs attached. From how I've seen others go about this final assembly, I don't see how I can possible do it. What I plan to do is have all three levels on their side, much as they are in the picture I've included here, and attached the legs to the front (or rear, one side, that is), and then lift the whole thing to put the other side's legs in place. Then I will just rock it to it's proper position. Nothing in the specs on the Amazon page shows the width of the top shelves. One of the customer reviews shows a bunch of numbers, and I believe they are about 13 5/8" wide. (I.e., the width between the two sides of the fixed brackets which is not adjustable). Mine are 11 5/8th inches wide, plus the width of the additional plywood bracing I'm putting in place, so it will all fit. I've gone through my receipts, translated the Spanish, and added up the Pesos to get a final price which I need to see in English, i.e., US dollars. He's the list: 2x4s (1620), color paint (745), respirator mask(75), sand paper (79), paint brush (87), primer (860), driver bits (85), circular saw (1599), cutting at Home Depot (90), 3 4x8 sheets of plywood (1155), screws (650). That is a grand total of 8042 Pesos which is $442.47 USD at today's exchange rate. For some reason, the second set of brackets was reduced in price from 99 USD to 87 USD, putting the total at $529 to complete the project. I have read the reviews several times now looking for information. There was one guy who said they built their table in about 30 minutes, and another that said it took an hour. I'm not calling anybody out on that; but I will say that you should probably not expect to be so quick. I have been working on this pretty consistently for a couple of weeks now. I have limited space in a second bedroom, and I have to carry everything up two flights of stairs. I have a station wagon; but it's a small one. With all the cutting, sanding, priming and painting, I'd say I probably have at least 30 hours in it. There is still one more trip back to San Diego to get the legs, as well. I hate to think about moving out of here, taking it apart and putting back together again. I'm retired and don't want to move again, so I won't do anything except hope I enjoy it for a LONG, LONG TIME! Update: added a picture almost finished. The shelf legs haven't been painted yet; but most of my junk has been organized back into place. The Raspberry Pis will get moved to the lower shelf and the larger monitor will be mounted on one of the shelf legs. Some LEDs will be added just because. I am glad this is done; but it makes one think. The workbench is more valuable than the junk :) Here's to a long life! Cheers!
R**N
A solid start towards a great work bench
The legs are well made and very study. I am pleased with the results. I would highly suggest that you build the bench one layer at a time. I followed the advice of another reviewer and built this one layer at a time instead of building the frame for all three layers at once. If you do all three layers, it would be very difficult to place your bench tops through the different layers. One layer at a time is the way to go. I also left out the middle table surface on the short end of my bench. This way I can place larger tools underneath. Overall, I am pleased.
J**P
works great
love it easy to put together and very good quality
Trustpilot
3 weeks ago
3 weeks ago