Some deliveries may take a little longer than usual due to regional shipping conditions.

DOWNLOAD THE APP


Customer Services
Copyright © 2025 Desertcart Holdings Limited
DOWNLOAD THE APP


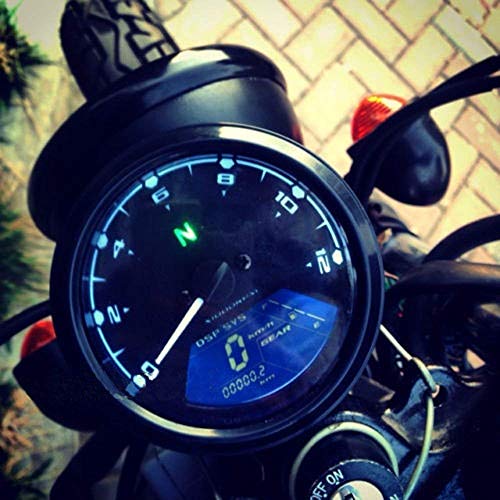


Buy MPH/KMH 124MPH/ 199kmh 12000 rpm LCD Digital Speedometer Tachometer Odometer for 4 stroke 1/2/4 Cylinders Motorcycle: Speedometers - desertcart.com ✓ FREE DELIVERY possible on eligible purchases Review: great quality! - fantastic quality and functionality. The only thing I could complain about is that it could have come with some wiring instructions. I'm very good with wiring things like this and the picture it shows of the wiring is way off. Review: No Wiring Diagram or Instructions!? READ THIS for help!! - This is a good looking speedometer. However, it was a pain to set up. It came with no wiring diagram or instructions for calibration and changing the settings. You'll have to pull the wires out of the harness and rearrange them or wire directly to the leads coming off your bike. I ended up just using bullet connectors on everything. It took some time to figure out which wire was which, and I'm not using the Gear Indicators or the Lights On signal, but this is what I came up with: (WARNING: Yours might be different!) Red: Constant Power Black: Power w/ Key Turned Green: Ground Yellow/Black: Tachometer Blue/White: Gas Gauge Light Blue: Right Signal Orange: Left Signal Brown/White: Lights On Signal Blue: High Beam Signal 6-Pin Harness: Ground to find indicated gear. Red/Green: Neutral Indicator 3-Pin Harness: Plugs directly to the included speed sensor. No rewiring needed. Tips: If your bike is newer, then it may have a chip in the ECU that combines several wires to simplify your dash/display wiring harness. Your stock dash would then have a chip to sort out the signals and operate the correct lights on your display. You should be able to bypass this by splicing directly into the wires before they enter your ECU. This will probably require running wires into your bike. For example, I spliced the tachometer wire into the wire coming off of my Crankshaft Position Sensor. Same goes for the Gas Gauge and Neutral Light Indicator. For the High Beam Signal and Turn Signal Indicators, I just spliced them to the actual High Beam and Turn Signal wires. Calibration: To enter the configuration menu, turn the key off, then press and hold the button on the back of the speedometer while you turn the key on. You will see a number "1" on the speedometer and a "C" with some numbers on the trip meter. I THINK this is the circumference (mm) of your tire with the speedometer sensor. Though I haven't yet confirmed that. Use short presses of the button to change the circumference, then long presses to move through the other settings. I'm not yet sure what the rest of the settings are, but I'll come back and edit this review when I figure it out. I hypothesize that they are the number of cylinders (to calibrate RPM), and something to do with calibrating your fuel tank. Another Tip: Leave the plastic on the face of the display until it is fully installed. You will likely scratch it while you're working on it, but probably wont scratch it after it's in its permanent location. Good luck!


| ASIN | B01J77O0OS |
| Date First Available | November 18, 2016 |
| Is Discontinued By Manufacturer | No |
| Item Weight | 14 ounces |
| Manufacturer | Fuzbaxy |
| Package Dimensions | 6.3 x 5.63 x 4.37 inches |
A**R
great quality!
fantastic quality and functionality. The only thing I could complain about is that it could have come with some wiring instructions. I'm very good with wiring things like this and the picture it shows of the wiring is way off.
N**N
No Wiring Diagram or Instructions!? READ THIS for help!!
This is a good looking speedometer. However, it was a pain to set up. It came with no wiring diagram or instructions for calibration and changing the settings. You'll have to pull the wires out of the harness and rearrange them or wire directly to the leads coming off your bike. I ended up just using bullet connectors on everything. It took some time to figure out which wire was which, and I'm not using the Gear Indicators or the Lights On signal, but this is what I came up with: (WARNING: Yours might be different!) Red: Constant Power Black: Power w/ Key Turned Green: Ground Yellow/Black: Tachometer Blue/White: Gas Gauge Light Blue: Right Signal Orange: Left Signal Brown/White: Lights On Signal Blue: High Beam Signal 6-Pin Harness: Ground to find indicated gear. Red/Green: Neutral Indicator 3-Pin Harness: Plugs directly to the included speed sensor. No rewiring needed. Tips: If your bike is newer, then it may have a chip in the ECU that combines several wires to simplify your dash/display wiring harness. Your stock dash would then have a chip to sort out the signals and operate the correct lights on your display. You should be able to bypass this by splicing directly into the wires before they enter your ECU. This will probably require running wires into your bike. For example, I spliced the tachometer wire into the wire coming off of my Crankshaft Position Sensor. Same goes for the Gas Gauge and Neutral Light Indicator. For the High Beam Signal and Turn Signal Indicators, I just spliced them to the actual High Beam and Turn Signal wires. Calibration: To enter the configuration menu, turn the key off, then press and hold the button on the back of the speedometer while you turn the key on. You will see a number "1" on the speedometer and a "C" with some numbers on the trip meter. I THINK this is the circumference (mm) of your tire with the speedometer sensor. Though I haven't yet confirmed that. Use short presses of the button to change the circumference, then long presses to move through the other settings. I'm not yet sure what the rest of the settings are, but I'll come back and edit this review when I figure it out. I hypothesize that they are the number of cylinders (to calibrate RPM), and something to do with calibrating your fuel tank. Another Tip: Leave the plastic on the face of the display until it is fully installed. You will likely scratch it while you're working on it, but probably wont scratch it after it's in its permanent location. Good luck!
J**N
Speed is not correct, tachometer is not correct, unable to properly calibrate. Cheap.
Let me start this review by saying that I'm a motorcycle mechanic. The build quality of this unit seems decent, it's what you'd except from something of this price point that's made in China (it's cheaply made, but not terrible). This speedometer/tachometer comes with some directions that are poorly translated into English and are barely readable. The colors of the wires referenced in the wiring directions do not match the actual wires on the back of the gauge. This made it pretty difficult to install, but after some guesswork and reading other reviews that had similar colored wires to mine, I figured it out. I got the gauge to power on, and got the tachometer, speedometer, and the indicator lights to all work. The bike I installed this on did not have a fuel level sending unit, so I could not hook up the fuel gauge. It annoyingly flashes on empty all the time, and cannot be disabled. If your bike doesn't have a fuel sending unit, this is going to annoy you. The tachometer is NOT accurate. I installed the unit on a 2 cylinder motorcycle, and set it up for 2 cylinders. The tachometer was displaying about half of the actual RPM's. I then switched the unit to 1 cylinder, to see if this would fix the issue and then it showed that the RPM's were double what they should be. Basically, you won't get the tachometer to be accurate. The needle moves and it lights up, but it's wrong. The speedometer is a huge pain to calibrate. Almost every other digital speedometer calibrates the speed based on the front tire diameter. This one uses an arbitrary multiplier to get the speed close. Its purely trial and error until you finally enter a multiplier number that gets you pretty close. You'll never get it right though. If you're ok with an annoying flashing fuel gauge, an incorrect tachometer, and a speedometer that's sort of close, you won't mind this gauge. If you want something that's functional, this is not it. Unless you're really good at motorcycle wiring and have a lot of experience with things like this, you won't get it to work. Even if you do get it to work, the speed and tachometer will always be wrong.
D**A
very nice looking seedometer for this price i didnt expect better ...
very nice looking seedometer for this price i didnt expect better im giving it 3 start for lack of information and the level of skill it takes to install it without real instruction i highly recommend making a search on google and youtube for instructuion theres couple videos tht will help and the second part that sucks the most is that they are not providing any kind of brackets for the speed sensor and the magnets are so weak that i hade to buy 4 magnets from home depot that fitted my disk holes all in all great product cheap but no instruction and requieres a lot of work will not recomend for beginner but great material if you now how to use it
A**ー
安い割にはいいですね。 調整めんどくさいけど…
S**E
ネット上の配線色図とカプラーの配線色が違うのでテスターで導通と電圧をかけて作動確認しながらの組線作業です。正直面倒です また、初期設定も色々タイプがあるようでC-0000で始まるタイプでした。レビューが大変参考になりました。メーターは見やすくタコ、スピードのレスポンスとインジケーターの表示もよいと思います。値段よりはいい商品だと思いますが取説ないので・・・
@**!
中華製の本田カブ系エンジンを積んだミニジープ(ATV)にも取付けができました。 ギアインジケータなど機能充実だし、オープニングセレモニーも格好良い☆ オドメーターとトリップメーターや、キロメートルとマイルがボタンで切り替えられて便利。 バックライトの強弱は無いが、日中でも見やすいし夜間でも眩しくない明るさです。 付属されている取説が1枚(英文)なので戸惑いましたが取付けは簡単でした☆ 但し、取説の通りに繋ぐとエンジンを切ってもバックライトが消えないので常時電源の箇所にACC電源を繋ぎました。 タコメーターのパルスはイグニッションコイル配線(黒/黄)を分岐して繋いだら動いたのでパルスジェネレーターは不要でした。 このメーターはスピードが上がっても誤差が少くないし、タコメーターのレスポンスも良くて使いやすい☆ メーターの設定方法は、 メーター裏のボタンを押しながら電源を入れると「 ccc--- 」と表示されるので ボタンを短く押して数字変更、長押しで隣に移動で「123」と入力すると設定モードです。 気筒数設定:「y1」は2気筒 「y2」は4気筒 速度設定:数値が意味不明なのでスマホのGPSアプリと同じ速度になるまで何度も数値を入力して調整しました(汗 燃料センサー:本田カブ系の抵抗100Ω センサーは「1」に設定。 ※ ミニジープの燃料タンクにはセンサーが無いのでセンサー配線(青/白)をマイナス極に繋いだら満タン表示になりました。
た**お
YBR125G(2009年?)に取り付けました。 全ての機能が正常に機能しています。 国産に無いシンプルな外観。ACC オンで豪華な演出と見易いタコ。気に入りました。 ちなみに自分の所に届いたメーターは、 ACCと常時電源はそれぞれ配線してやらないと 液晶部に数字が表示されませんでしたし、 タコメーターも動きませんでした。 メータの液晶のバックライトはONだけどOPセレモニー的なやつがない、 数値表示無されない病の人、お試し下さい! ※YBR 回転数信号入力について。 CDI~既存メーターへのバイク側信号線(青/黄)を、 本品の赤/黒線に結線してやれば入力された 回転数信号をちゃんと認識してくれます。 ※速度の係数:磁石2つで0.28でスマホアプリの速度と同じになりました。
み**ん
説明書が入っていなかったので全ての配線にテスター当ててなんとか接続した。 実はこのメーターを使うのは二度目なのだが安物にしてはタコメーターのラグも少なく視認性も良いので気に入ってはいる。 しかし取り付けして3ヶ月もしないうちに取り付けネジが片方折れ、さらにタコメーターが狂って使い物にならなくなったしまった。私の知人もこれを買っていたのだが同じような状況らしい。 このメーターをつけているバイクは雨の日は絶対に乗らず保管も車庫内保管であるため使用環境は悪くないはずなのにこのザマである。安物だから仕方ないとはいえここまですぐぶっ壊れるのはどうかと思う。
Trustpilot
2 months ago
1 month ago