
Desert Online General Trading LLC
Dubai, United Arab Emirates
Desert Online General Trading LLC
Dubai, United Arab Emirates


🐣 Hatch Your Dreams with Ease!
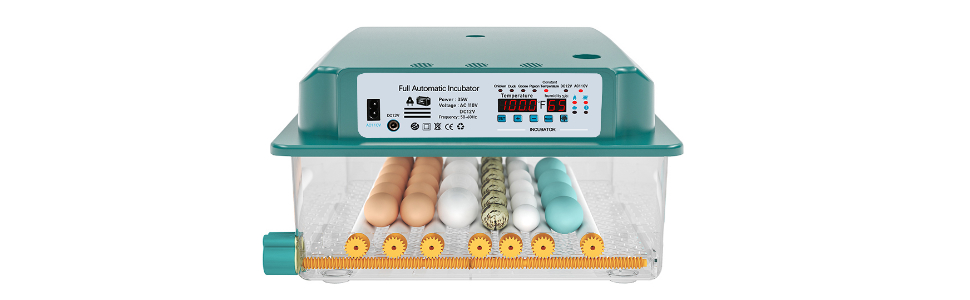
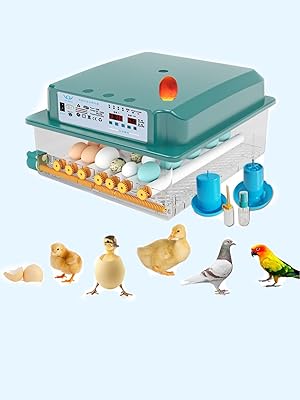
The Fahrenheit 36 Eggs Incubator is a state-of-the-art home incubator designed for hatching various types of eggs, including quail, duck, and chicken. It features dual power support for uninterrupted operation, automatic egg turning, customizable incubation modes, and efficient humidity monitoring, making it an essential tool for both novice and experienced breeders.


L**N
It does what it's supposed to
I bought this incubator early with great trepidation, based on the mixed reviews. My eggs haven't arrived yet, so I had plenty of time to test it out for a few days without worrying about the machine or myself making a mistake. (Of course eggs don't have to be placed in the incubator right away, so it's good to get to know the machine before doing so). Temp setting was very stable, egg turner worked perfectly (it's very slow so you have to really watch it to notice that it's moving (your eggs will appreciate that!); the candle light was a little tricky (regular press and long press didn't work; quick short presses did); the directions were generic covering many different machines and not the one i received specifically. Finally, the humidity. Yes, it decreased regularly, but this is to be expected based on many factors and is in no way representative of the machine itself. I have read that Unlike temperature - which needs to be kept constant - humidity can vary greatly without having any adverse effect on your hatch. Guidelines suggest an average humidity level of 50-55%. But in reality, keeping within such a tight range is almost impossible, even for incubators with full humidity control (such as the Rcom King Suro Max 20, below). Your actual humidity levels are likely to vary, up and down, between 40% up to around 65%, before heading back down again. This is perfectly normal and nothing to be concerned about. So, relax!However, I can't see leaving the incubator completely unattended for 24 hours because the humidity will need to be adjusted. Fortunately you can hook the unit up to a battery and take it with you if needed. Within a 12 hour period your humidity will change drastically requiring you to add water. Add a couple drops and wait! Give the machine a chance to heat the water and recognize it as humidity. When the humidity stops climbing, and needs to be higher add another drop or two more and wait. Patience is key.
L**4
Highly, HIGHLY do not recommend
Update: The seller has offered a full refund upon reading my review, so I do greatly appreciate the customer service.Please do not get this incubator. I know this is long, but it’s important. It ruined many hatches with its many issues. I raise chickens and quail, and got one incubator initially. I soon realized that wasn’t going to be enough, and I needed another for my “over flow”. I didn’t want to drop a ton of money on another after having bought one already. So, I took a risk and went with a cheaper one— this one. At the time, it didn’t have a lot of reviews, but after seeing some very rudimentary homemade incubators out there that work well, I thought this one couldn’t be any worse, right? Very, very wrong.I started off with quail in this because I wanted a chance to “figure out” this incubator and quail eggs are pretty forgiving. They can handle a little more flux and issues, and each incubator has its quirks and kinks. My very first issue was that, despite leaving the styrofoam on the base for extra insulation, this thing has SO much trouble maintaining temps. Not only that, but the temperature is wildly inaccurate as proven by 2 secondary digital hygrometers. To get the temp to 99.5 Fahrenheit, the incubator had to be set at 102.3 degrees. In other words, the internal gauge was off by almost 3 whole degrees. There were also times when the internal thermometer of the incubator claimed to still be at 102.3, but my secondary hygrometers both fell in temp to 99 even. These are high-accuracy, correctly calibrated digital hygrometers and were not wrong. This type of fluctuation is lethal if you do not have another source for checking temp and you go off of the incubator alone. The relative humidity (Rh) gauge was the only thing about this that was in any way consistent. It varied by about 1%, which is a minuscule difference. The problem with the humidity was rather the impossibility of keeping the humidity in the correct zone. When I say it was impossible, I truly mean it. Never in my life have I had such trouble with humidity in an incubator. If you weren’t there to constantly babysit it, and add water literally hourly on the hour, the Rh would fall drastically. And this was before lockdown when Rh didn’t even need to be high. When it did need to be bumped up to 60%+ for lockdown, I tried every trick under the sun to get it there and it would not stay longer than a few minutes. This is despite the water trays being full, using the wicking method, adding small cups of water, misting, etc. The amount of time I spent stressing and waking up multiple times a night in a panic to check it and adjust it was in and of itself enough to make me regret this incubator. Bear in mind that this incubator was also sitting in an ideal location with very acceptable ambient temps and humidity levels. The constant inconsistencies resulted in staggering of hatches and the death of many. Many were shrink wrapped because they did not hatch in the same time frame as others. Many were too weak to hatch out at all and were barely able to pip. Many eggs didn’t fully develop at all. Out of 40 eggs, I only got 5 live babies on the first go.Because I am nothing if not persistent, I tried again taking all my knowledge from the first hatch and using it to hopefully get better results. I covered the incubator with towels (yes, plural) because that’s what it took to maintain a mostly even temp. I also tried something new with the humidity by also misting the towels until they were damp around the incubator. Once again, though, I kept having issues. Sometimes the temperature would just randomly fall for no reason. My digital hygrometers connect to my phone and create data charts so I can see all past rh and temp fluctuations and how long they last. I woke up once to the temp being 98.6. I looked back at the data and it had fallen and stayed that way for hours over night. A minor temp fall isn’t unheard of at night when ambient temps can also fall, but this hadn’t been the case and this night was exceptionally warm. I quickly tried to trouble shoot thinking maybe the lid wasn’t seated correctly, maybe a towel had fallen off, etc. There are no drafts in this room, so I knew it wasn’t that. There wasn’t any explanation, everything was as it should have been on the outside. Frustrated, I bumped the heat and added more towels. Finally it went up, but I had to keep it that way for the remainder of the hatch. Despite my best efforts, I still had Rh troubles as well. Again, a bad hatch rate and the same problems.I decided I was done with this incubator, but then I had extra fertilized chicken eggs that wouldn’t fit in my other incubator. I decided since it was just a few, I’d try the incubator one last time knowing there was a good chance of bad results. Chicken egg needs are much more strict, and to add insult to injury with this incubator, the egg turners started malfunctioning during this incubation period. They now stopped turning manually when I pushed the button, and they rarely turned on their own. They would only do so here and there. Unfortunately, I don’t know how long they weren’t working properly before I noticed. I started turning the eggs by hand, but to do this, I had to consistently open the incubator and it just would not recover temps well after being open even just 20 seconds. It was an all around disaster and 0 eggs hatched. They all quit developing by about day 12.In conclusion, this incubator is a complete fail. Save your money and yourself from stress and heartache.
S**A
A bit of advice...
This thing works great, but there's a couple things that took some figuring out.1. The eggs move down the rollers towards the small side of the egg. So if the small side points to the right they'll move towards the right side of the incubator throughout the day and vice versa.Solution: Place the eggs in pairs with the small sides facing eachother. Then they rotate in place.2. The light is finicky.Solution: Double click slowly. Quick double clicks do not register and single clicks have not worked for me at all.3. The blue watering dish that came with the incubator is big enough for quail chicks to drown or get wet, which kills them.Solution: Put some small rocks or marble in the dish so the quail can still drink between them, but they cannot drown or get into the water.If you follow this advice, this is a great incubator. Happy hatching!
C**A
Nice!
Looks just as pictures! Is currently full of eggs that should be hatching soon! The light for candeling works great!
Trustpilot
2 months ago
4 days ago